
This guide is a step by step guide on how to deploy a Ethermint faucet.
Ethermint
The first step is to build an run a Ethermint node, the guide on how to build the node is HERE
Run Ethermint:
Run the Ethermint init script.
./init.sh
Shell
NOTE: the init.sh script requires jq
# jq not installed. More info: https://stedolan.github.io/jq/download/
sudo apt-get install jq
Shell
Create the faucet wallet:
The faucet API requires a secp256k1 wallet, so let’s create one using the ethermintd cli.
$ ethermintd keys add faucetkey --keyring-backend test --algo secp256k1
- name: faucetkey
type: local
address: ethm1vqvc29pzn4g84q0sq4zlq0xzu09hzek89hep9v
pubkey: '{"@type":"/cosmos.crypto.secp256k1.PubKey","key":"A8XfkqkxA9SwxHU8AFFQNoiumGueDpqrVllKqkH3N3G/"}'
mnemonic: ""
**Important** write this mnemonic phrase in a safe place.
It is the only way to recover your account if you ever forget your password.
ankle life barrel beauty fossil harbor solar affair perfect crater twist soccer round endless buffalo prosper vicious magic pair include rabbit ring romance chunk
Shell
Get the wallets addresses to send founds to our new wallet using the validator address.
$ ethermintd keys list
- name: faucetkey
type: local
address: ethm1vqvc29pzn4g84q0sq4zlq0xzu09hzek89hep9v
pubkey: '{"@type":"/cosmos.crypto.secp256k1.PubKey","key":"A8XfkqkxA9SwxHU8AFFQNoiumGueDpqrVllKqkH3N3G/"}'
mnemonic: ""
- name: mykey
type: local
address: ethm1fpxquzty6sr5g75duhahxchytpnx6dj0djljet
pubkey: '{"@type":"/ethermint.crypto.v1.ethsecp256k1.PubKey","key":"Asj0BiBObrojLV+yX1+cUpt4zhEljfLCFopx54VUJ2uc"}'
mnemonic: ""
Shell
Send founds to our faucet wallet, the parameters must be sending wallet (your mykey wallet), destination wallet (the faucetkey wallet) and amount (100Photons).
$ ethermintd tx bank send ethm1fpxquzty6sr5g75duhahxchytpnx6dj0djljet ethm1vqvc29pzn4g84q0sq4zlq0xzu09hzek89hep9v 100000000000000000000aphoton -b block -y --fees 20aphoton
code: 0
codespace: ""
data: 0A1E0A1C2F636F736D6F732E62616E6B2E763162657461312E4D736753656E64
gas_used: "96338"
gas_wanted: "200000"
height: "209"
...
tx: null
txhash: 6F8BB6CF658D79883A17EBBE9403726A1DF1FADAE52E5E31ED2D1C48180D0A65
Shell
NOTE: if you get and error required: 20aphoton: insufficient fee, just update the fee parameter to the one required here and call again the ethermintd tx bank method.
NOTE: if you have insufficient founds, let the node run and then claim your rewards:
ethermintd tx distribution withdraw-all-rewards --from mykey --fees 20aphoton -b block
Shell
Faucet
We first need to clone the repository:
git clone https://github.com/hanchon-live/ethermint-faucet-backend
cd ethermint-faucet-backend
Shell
Requirements:
We need a postgres running. Ff we have docker installed, we can run:
docker run -d -p 127.0.0.1:5432:5432 --name my-postgres -e POSTGRES_PASSWORD=test -e POSTGRES_DB=faucet postgres
Shell
NOTE: we can bind the port to just localhost to avoid directly exposing postgres to the internet.
Configuration:
First get the wallet mnemonics from create faucet wallet step.
Second we need to create our Auth0 credentials, instructions at the end of this guide.
Set up the environment variables:
export POSTGRES_HOST=localhost
export POSTGRES_PORT=5432
export POSTGRES_DB=faucet
export POSTGRES_USER=postgres
export POSTGRES_PASSWORD=test
export PROM_USER=prom
export PROM_PASSWORD=client
export NETWORK_RPC_NODE="http://127.0.0.1:26657"
export FAUCET_WAIT_PERIOD=1d
export FAUCET_DISTRIBUTION_AMOUNT=1000000000000000000
export FAUCET_DENOM=aphoton
export FAUCET_FEES=5000
export FAUCET_GAS=180000
export FAUCET_MEMO="Sent from Hanchon's Faucet"
export ADDRESS_PREFIX="ethm"
export AUTH0_DOMAIN="hanchon.eu.auth0.com"
export AUTH0_AUDIENCE="https://faucet.hanchon.live"
export FAUCET_MNEMONIC="ankle life barrel beauty fossil harbor solar affair perfect crater twist soccer round endless buffalo prosper vicious magic pair include rabbit ring romance chunk"
Shell
Run the faucet:
Install the node modules, and run the supportEthermint.sh file to allow the js-libs to use the Ethermint proto messages:
yarn install
./supportEthermint.sh
Shell
NOTE: if you have not installed node in your machine, you can follow the guide to install nvm. Followed by npm install –global yarn.
Run the migrate script to create the tables:
yarn migrate
Shell
Run the app:
yarn start
Shell
If everything went OK, it should print something like this:
$ yarn start
yarn run v1.22.11
$ node ./bin/www
{"level":30,"time":1629992255968,"pid":2717092,"hostname":"elsiete","msg":"Server listening at http://127.0.0.1:3000"}
{"level":30,"time":1629992255969,"pid":2717092,"hostname":"elsiete","msg":"server listening on http://127.0.0.1:3000"}
Shell
Test the app:
$ curl 127.0.0.1:3000
{"faucetAddress":"ethm1vqvc29pzn4g84q0sq4zlq0xzu09hzek89hep9v","chainId":"ethermint_9000-1","distributionAmount":"1000000000000000000","distrbutionDenom":"aphoton"}
Shell
Nginx
Configure a Nginx server to proxy the requests to the faucet API.
Install Nginx is needed following this guide.
Create a proxy for our domain:
touch /etc/nginx/sites-available/faucet
Shell
Configure your domain:
server {
listen 80;
listen [::]:80;
server_name faucet.hanchon.live;
location /api/ {
proxy_pass http://127.0.0.1:3000/;
include proxy_params;
}
}
Plain Text
Point your domain to the server:
Create an A Record with faucet pointing to your server ip.

Namecheap domain config.
Activate the domain:
Create a link to the sites-enabled folder.
ln -s /etc/nginx/sites-available/faucet /etc/nginx/sites-enabled/
Shell
Validate your nginx configuration and restart your server.
nginx -t
systemctl restart nginx
Shell
Test the /api endpoint in your browser:

Api request using browser.
Host the frontend:
Add the location / pointing to our static file:
root /var/www/faucet/html;
index index.html;
location / {
try_files $uri $uri/ =404;
}
Plain Text
Clone the faucet frontend
Clone and build the faucet frontend:
mkdir -p /var/www/faucet/html
git clone git@github.com:hanchon-live/ethermint-faucet-frontend.git
cd ethermint-faucet-frontend
yarn install
export REACT_APP_AUTH0_DOMAIN="hanchon.eu.auth0.com"
export REACT_APP_AUTH0_CLIENT_ID="81ENFGCx8jGSN9kSYFWfKMCEPPcUe4Nu"
export REACT_APP_AUTH0_AUDIENCE="https://faucet.hanchon.live"
yarn build
cp -r ./build/* /var/www/faucet/html/
Shell
Validate your nginx configuration and restart your server.
nginx -t
systemctl restart nginx
Shell
The Auth0 lib requires that the origin is secured, so we are going to install the https certificates, more info in the Nginx guide.
certbot --nginx -d faucet.hanchon.live
Shell
Auth0
Register here: https://auth0.com/pricing
Go to Applications -> API -> Create API
Set the name and identifier.
NOTE: save the identifier value that is our AUDIENCE value.
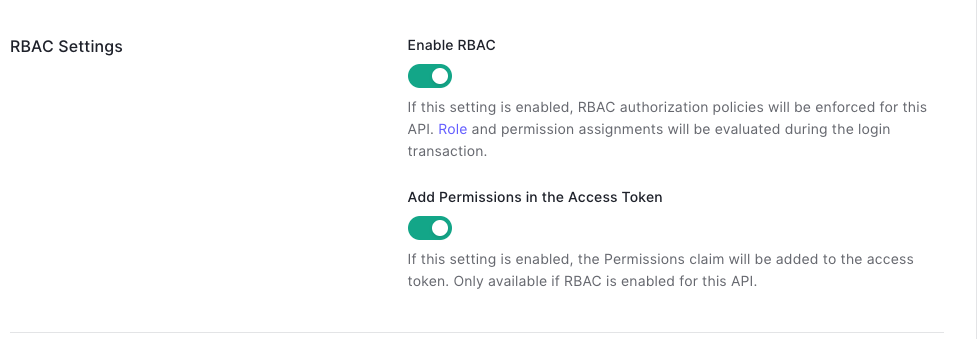
Go to the API Settings and activates the 2 RBCA options and SAVE.
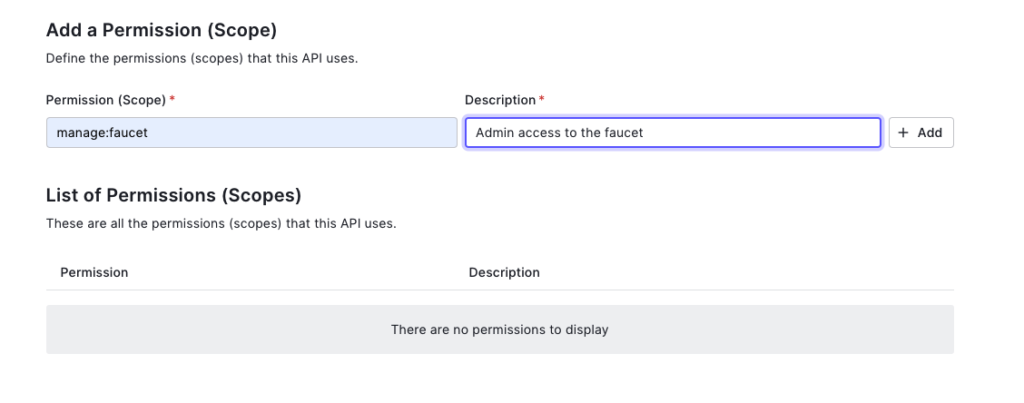
Go to the API Permissions and create the manage:faucet rol.
Go to Getting Started -> Try your Login box, and Log in with your admin account, so the user gets registered (Later we are going to give this user admin role)
Go to Applications -> Applications -> Create Application
Create a Single Page Web Application.
Go to your created Application’s Settings and save:
Domain
Client ID
Set your faucet url on the following options (ie. https://faucet.hanchon.live):
Allowed Callback URLs
Allowed Logout URLs
Allowed Web Origins
Allowed Origins (CORS)
SAVE CHANGES
Go to User Management -> Roles.
Create the role faucetadmin.
In the new role permissions, press add permissions select your api and then manage:faucet.
Go to User Management -> Users.
Select your user (it was created when you logged in)
Press the … and assign permissions and select manage:faucet.
Deployed faucet:
The website looks like this: faucet.hanchon.live